
Every object on a slide has a position and a size. Change them by dragging on the slide, from the keyboard, or by typing exact numbers.
Move or resize with the mouse
- #
Click the object on the slide to select it. A selection box appears, with a square handle at each corner and on each side.
- #
Drag the object to move it.
- #
Drag a side or corner handle to resize it. Hold Shift while dragging a corner to keep its proportions.
- #
Press Escape during a drag to cancel it and put the object back where it started.
Type an exact position and size
- #
Select the object and open the Format tab.
- #
In Size and Position, type X, Y, W (width) and H (height) in pixels. Press Enter to apply or Escape to put the old value back. Up and Down step 1 pixel, and 10 with Shift.
- #
Lock aspect ratio, next to the boxes, keeps the proportions when you change the width or height. Choose it again to turn it off. It is a setting for your editing session, not part of the course.
- #
Fit box to text resizes a text box to its text. Size and position opens the Inspector's Size & position section.
Nudge from the keyboard
- #
Select the object.
- #
Press the arrow keys to move it 1 pixel at a time, or hold Shift to move it 10 pixels.
Line objects up, stack and group them
The arrange commands are in one drop-down, Arrange, in the Drawing group of the Home tab, and in the Arrange group of the Format tab.
- #
Select the objects. Hold Ctrl to select more than one.
- #
Choose Align and pick Align left, Align centre, Align right, Align top, Align middle or Align bottom. With three or more objects selected, Distribute horizontally and Distribute vertically space them evenly.
- #
To change which object sits in front, choose Order and pick Bring forward, Send backward, Bring to front or Send to back. The shortcuts are Ctrl+] and Ctrl+, adding Shift for front and back. You can also drag rows in the Timeline; see [change which object is in front in the Timeline.
- #
Choose Group (Ctrl+G) to move objects together, and Ungroup (Ctrl+Shift+G) to separate them again.
- #
Selection Pane takes you to the selected object's row in the Timeline, where every object on the slide is listed. It is also under Home › Editing › Select.
Rotate an object
- #
Select one or more objects and open the Format tab.
- #
In the Arrange group, open Rotate.
- #
Choose Rotate right 90° or Rotate left 90°, or type an Angle (°) and press Enter. All the selected objects turn in one step you can undo.
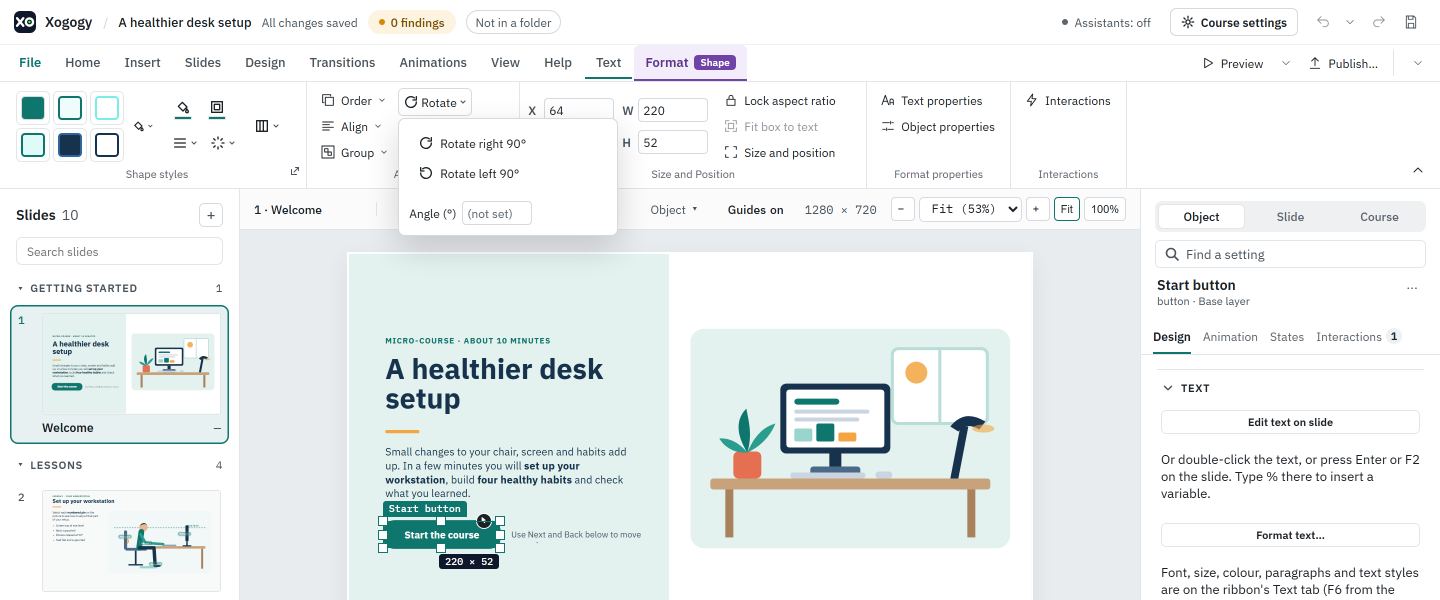
There is no flip yet. Rotation is shared by every state of an object, so Rotate is off while you edit a state.
Lock or hide an object while you work
- #
Open the ⋯ menu on the object's row in the Timeline.
- #
Choose Lock so it cannot be moved by accident, or Hide to get it out of the way on the slide. This lasts for this editing session only; the saved course does not change.
On a scrolling page, pictures are not placed freely: their side handles snap between Small, Medium, Large and Full width. See size and align a picture on a scrolling page.
Tip: A whole drag is a single step in your history, so one Undo puts the object back. A locked object tells you why it cannot be moved when you select it.
Still stuck?
Write to support@xogogy.com. A person at GForce Learning reads every message. Include the app version from Help › About Xogogy.