
The theme holds a named set of colours and two fonts. Objects that use a theme colour, rather than a fixed one, change everywhere when you change the theme.
Change a colour
- #
Choose Design › Theme colours. Course settings › Player & appearance opens at the colours.
- #
Under Theme Colours, pick the colour to change: Text, Background, Text 2, Background 2, Accent 1 to Accent 6, Link, Visited link, Correct answer or Incorrect answer.
- #
Choose a new value. Choose Clear to remove it.
- #
To add one of your own, choose + Add a theme colour….
Change the fonts
- #
Choose Design › Theme fonts.
- #
Under Fonts & Scale, open the Major (heading) font or Minor (body) font list. Click the arrow or press Alt+Down to see the fonts, each shown in its own typeface, or type to narrow the list.
- #
Pick a font from Included with every course, Theme fonts, Used in this course, Added to this project or Standard fonts, and press Enter. A theme font has to travel with the course, so fonts that are not bundled or packaged with it are dimmed, with the reason.
- #
Change Font scale (%) to make all theme text larger or smaller.
When the import report lists Fonts not in the project, set these two fonts to choose what learners see instead. To swap one font for another on every object at once, ask your connected assistant to replace the font. See what to ask your assistant.
Fonts included with every course
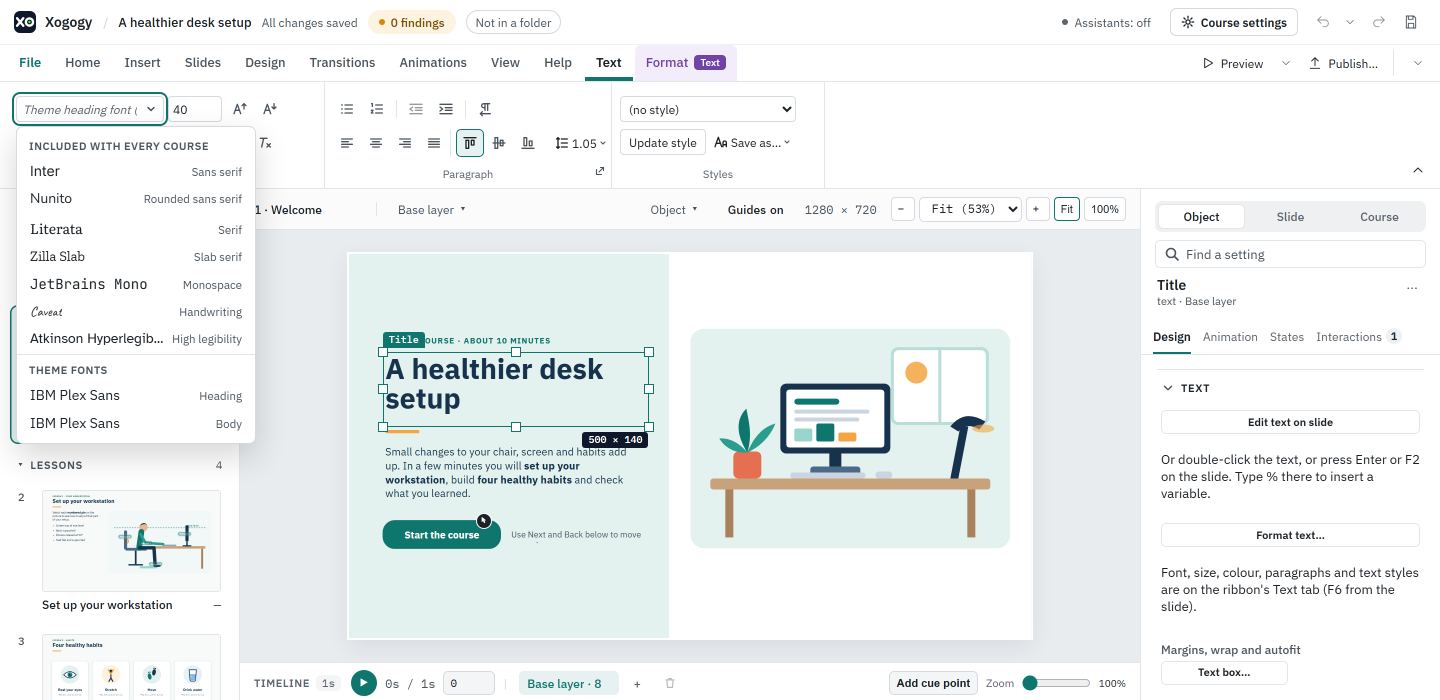
Xogogy comes with seven font families under the SIL Open Font License. A course that uses them looks the same on your computer, in Preview and for every learner, whatever fonts their computer has.
| Font | Kind | Good for |
|---|---|---|
| Inter | Sans serif | Body text and labels |
| Nunito | Rounded sans serif | Friendly headings and informal courses |
| Literata | Serif | Headings and longer reading |
| Zilla Slab | Slab serif | Strong headings |
| JetBrains Mono | Monospace | Code and commands |
| Caveat | Handwriting | Notes and short callouts, not body text |
| Atkinson Hyperlegible | High legibility | Courses for low-vision readers |
- Pick one: every font list shows them first, under Included with every course, each in its own typeface. They are always available, so they are never marked not installed, and the theme font lists accept them.
- New courses use Literata for headings and Inter for body text. A course you imported or made earlier keeps the fonts it names.
- When you publish, the package carries only the included fonts the course uses, with each font's licence. Inter and Literata together add about 0.4 MB, and a course that uses none of them gains nothing.
- Other fonts, such as an imported course's Calibri or a font installed on your computer, work as before: learners see them only if their computer has them, and otherwise a similar standard font.
You can also ask your assistant, for example "use Literata for headings and Inter for body text".
Change the name and background
Tip: When you colour an object, pick from the theme colours row in the colour picker. The object then follows any later theme change. To give older plain objects the theme styles, use Course look on the Design tab.
Every change is one step you can undo with Ctrl+Z.
Still stuck?
Write to support@xogogy.com. A person at GForce Learning reads every message. Include the app version from Help › About Xogogy.