
All text formatting is on the ribbon's Text tab. It appears when you select an object that has text, or while you edit text on the slide.
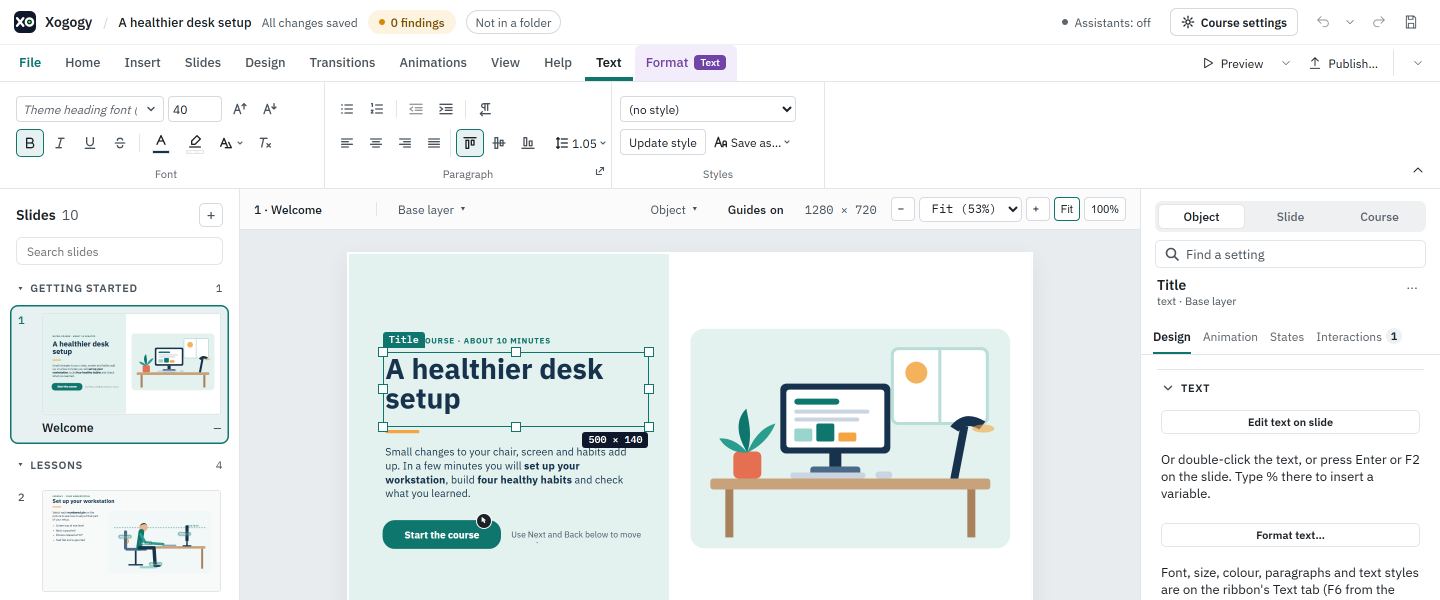
Format a few words
- #
Double-click the text on the slide and select the words you want to change. The Text tab opens by itself.
- #
In the Font group, choose Bold, Italic, Underline or Strikethrough, pick a Text colour or Highlight colour, or change the font and size.
- #
Keep typing or click outside the text to finish. Using a control does not end your edit: the caret and the selection stay in the text.
Format a whole text object
- #
Click the object once so it is selected but not in editing mode.
- #
On the Text tab, set the font, size, Text colour or alignment. The change applies to all the text in the object, and other formatting such as bold words stays as it was.
- #
To format several objects at once, hold Ctrl and click each one first.
What is on the Text tab
- Font: the font and size boxes, Grow font and Shrink font, then Bold, Italic, Underline, Strikethrough, Text colour, Highlight colour, Text effects (shadow, glow and outline width) and Clear formatting.
- Paragraph: Bullets, Numbering, Decrease indent, Increase indent and Right-to-left text, then left, centre, right and justified alignment, Top, Middle and Bottom to place the text in its box, and Line and paragraph spacing (line spacing, space before and space after). The small button in the group's corner opens the text box settings: margins, wrap and autofit.
- Styles: the Text style list, such as Heading 1 (28 pt) or Body (14 pt), Update style to change a style to match this text (every paragraph using it changes), and Save as… to make a new style from it.
In a narrow window, the groups that do not fit are under More. Choosing one opens a Text formatting panel with every control; Escape closes it and returns you to the text.
Use the keyboard
| Keys | What they do |
|---|---|
| F6 | Go from the slide (or from text you are editing) to the font box on the Text tab. Escape goes back to the text. |
| Ctrl+B, Ctrl+I, Ctrl+U | Bold, italic, underline |
| Ctrl+Shift+> and Ctrl+Shift+< | Grow and shrink the font |
| Ctrl+L, Ctrl+E, Ctrl+R, Ctrl+J | Align left, centre, right and justify |
The keys work while you edit text and while a text object is selected on the slide. Help › Keyboard shortcuts… lists them under Text formatting.
Choose a font
Every font box is a list you can type in: the Text tab's font, the theme fonts and the player fonts.
- #
Click the arrow, or press Alt+Down, to see every font. Each name is shown in its own typeface.
- #
Type to narrow the list, use Up and Down to move, and press Enter to apply. Escape closes the list.
- #
The list is grouped into Included with every course, Theme fonts, Used in this course, Added to this project and Installed on this computer. The seven included fonts look the same for every learner; see fonts included with every course.
You can still type a name that is not listed and press Enter. A font the course uses that this computer does not have is marked not installed; learners see it only if their computer has it.
Headings for screen readers
To mark a title as a heading, select the text object, open the Inspector's Design tab and set Heading level in the Accessibility section, from Heading 1 (H1) to Heading 6 (H6).
Tip: A mixed selection shows Mixed instead of a value, and an empty box shows the value the text actually uses, such as Theme body font. The Inspector's Text section has a Format text… button that opens the Text tab, and Text box… for margins, wrap and autofit in Format details. Find a setting finds every text setting and takes you to its control on the Text tab.
On a scrolling page, block text uses the same Text tab while you edit it. See How do I edit and format text on a scrolling page?.
Every formatting change is one step you can undo. Changes made while you edit text are one step when you finish the edit.
Still stuck?
Write to support@xogogy.com. A person at GForce Learning reads every message. Include the app version from Help › About Xogogy.